https://code.google.com/p/jthaipdf/
https://drive.google.com/file/d/0B1xeW-nyJXKxVHV3cExJT05IUHc/view?usp=sharing
วันจันทร์ที่ 23 พฤศจิกายน พ.ศ. 2558
วันพุธที่ 18 พฤศจิกายน พ.ศ. 2558
Unit Testing
Unit Testing Made Easy (ตอนที่ 1)
โปรแกรมเมอร์หลายๆ คนกลัวเรื่อง Unit Testing และรู้สึกเป็นเรื่องไกลตัวที่ยากต่อการทำความเข้าใจ โดยเฉพาะอย่างยิ่งโปรแกรมเมอร์ที่ยังไม่ได้เรียนรู้การจัดระเบียบแอพพลิเคชั่นที่พัฒนาเป็นโมดูลหรืออ็อบเจ็กต์ที่ชัดเจน จะยิ่งสับสน ไม่รู้ว่า Unit Testing จะเอาไปใช้ในงานได้อย่างไร บทความนี้ผมจะเขียนแนะนำแนวทางของการนำ Unit Testing ไปใช้ โดยมีข้อกำหนดดังนี้
- คุณต้องมีรูปแบบการพัฒนาแอพพลิเคชั่นแบบ OOP ที่มีระเบียบและแบ่งงานได้ดีพอสมควร
- เข้าใจเรื่องของ OOP ในระดับพื้นฐาน เข้าใจขอบเขตการทำงานของคลาสและเนมสเปซ ไม่สับสน
- พร้อมที่จะเปลี่ยนวิธีการเขียนโปรแกรมแบบหน้ามือเป็นหลังมือ
ถ้าสามข้อนี้พร้อม ก็เริ่มต้นอ่านกันได้เลย
Unit Testing คืออะไร..?
ในการพัฒนาโปรแกรม การทดสอบโปรแกรมเป็นเรื่องที่จำเป็นมากๆ คงไม่มีโปรแกรมเมอร์คนไหนเขียนโปรแกรมโดยไม่มีการเทสหรือทดสอบโปรแกรมกันก่อน
แต่ประเด็นเรื่องการทดสอบโปรแกรมนี่แหละครับ ที่เป็นที่มาของปัญหา ว่ารูปแบบการทดสอบโปรแกรมที่ถูกต้อง ควรมีขั้นตอน ที่มาที่ไปอย่างไร และพวกฝรั่ง ซึ่งเป็นเผ่าพันธ์ที่ชอบการนิยาม ตั้งกฏเกณฑ์ และวางแนวทาง จึงพยายามสร้างกฏเกณฑ์สำหรับการทดสอบโปรแกรมเบื้องต้น โดยทั่วไปจะมีการทดสอบพื้นฐานอยู่ดังนี้ (แต่ละทฤษฏีอาจจะแตกต่างกันไป ไม่ต้องซีเรียสนะครับ)
1. Unit Testing
2. Integration Testing
3. System Testing (หรือ Production Testing)
4. Acceptance Testing
เพื่อความเข้าใจง่าย ผมจะเปรียบเทียบเรื่องแนวทางการทดสอบโปรแกรม กับเรื่องของการสร้างรถยนต์ สมมุติว่าคุณเป็นวิศวกรสร้างรถยนต์ตามสั่งให้กับเศรษฐี สิ่งแรกที่คุณจะต้องเริ่มทำก็คือการออกแบบรถยนต์ถูกไหมครับ คุณจะต้องสอบถามและเก็บข้อมูลความต้องการให้กับลูกค้ามหาเศรษฐีรายนั้น (Requirement) เมื่อออกแบบรถยนต์เป็นที่เรียบร้อย ตามแบบแปลน (System Analysis and Design)
ขั้นต่อไปก็คือการสร้างอะไหล่แต่ละชิ้น (Unit) ตามแบบแปลนที่วางไว้
ที่นี้แหละครับ เมื่ออะไหล่แต่ละชิ้นสร้างเสร็จ คุณก็จะต้องทดสอบว่า อะไหล่ชิ้นนั้นๆ ทำงานได้สมบูรณ์ไม่ผิดพลาด ไม่เสีย ไม่ว่าจะเป็นฟันเฟือง ไดชาร์ต มอเตอร์สตาร์ท แบตเตอรี่ การทดสอบดังกล่าวจะเป็นการทดสอบอะไหล่แต่ละชิ้นโดยไม่มีการเชื่อมต่ออะไหล่ใดๆ เข้าด้วยกันทั้งสิ้น และการทดสอบอะไหล่นี่แหละครับที่เราเรียกว่า Unit Testing
หลังการทดสอบ Unit Testing เรียบร้อย เราจะสามารถมั่นใจได้เลยว่า อะไหล่แต่ละตัวทำงานได้อย่างถูกต้องสมบูรณ์แน่ๆ ขั้นตอนต่อไปคือการนำอะไหล่เหล่านั้นมาประกอบกันเป็นตัวรถยนต์ หลังจากประกอบกันเรียบร้อยแล้วคุณจะต้องทดสอบรถคันนั้น และในขั้นตอนนี้คือการทดสอบที่เรียกว่า Integration Testing ครับ
ถ้าอะไหล่ทุกชิ้นทำงานถูกต้อง แต่เมื่อประกอบกันเข้าแล้ว รถยนต์ขับเคลื่อนไม่ได้ แปลว่าการเชื่อมต่อนั้นมีปัญหา ขั้นตอนการตรวจสอบแก้ไขก็จะเป็นเรื่องที่ง่ายขึ้น คือเราไม่ต้องลงไปดูอีกแล้วว่า อะไหล่นั้นเสียหรือเปล่า เพราะขั้นตอนการตรวจสอบอะไหล่นั้นเรียบร้อยไปตั้งแต่ตอนทำ Unit Testing แล้ว หากอะไหล่ไม่เสีย การเชื่อมต่อระหว่างอะไหล่ถูกต้อง รถยนต์ย่อมจะต้องขับเคลื่อนได้จริง
หลังจากนั้น ในขั้นที่ 3 รถต้นแบบที่ถูกต้องสมบูรณ์จะต้องถูกนำไปทดสอบในสถานที่จริงครับ การทดสอบ Integration Test นั้นเป็นเพียงการทดลองขับรถในโรงงานว่าขับได้จริงหรือไม่ แต่เพียงแค่นี้คุณจะเอารถออกขายเลยไม่ได้เด็ดขาด คุณจะต้องทดสอบรถคันดังกล่าว บนถนนจริงๆ สภาพแวดล้อมจริงๆ เพื่อให้มั่นใจได้ว่า รถคันนี้เมื่อนำไปขับในโลกภายนอกแล้ว สามารถทำงานได้เหมือนการทดสอบในโรงงาน ขั้นตอนนี้เราเรียกว่า System Testing ครับ (หรือ Production Testing)
เมื่อทุกอย่างเรียบร้อย วิศวกรก็จะต้องทำการส่งมอบรถกับบริษัท ทีนี้แหละครับ ลูกค้าจะเริ่มทดลองขับรถ ถ้าลูกค้าทดลองขับแล้วอัตราเร่ง การเข้าโค้ง ช่วงล่างนิ่มได้ดังใจที่ลูกค้าต้องการ ก็เป็นอันจบเรื่อง แต่ถ้าลูกค้าเรื่องมาก บอกว่าช่วงล่างแข็งเกินไป หรือเข้าโค้งได้ไม่นิ่มนวล และปฏิเสธไม่ยอมรับรถของคุณ
ทีนี้ล่ะครับที่เป็นเรื่อง เพราะรถยนต์ถูกออกแบบตาม Requirement เบื้องต้นไปแล้ว การจะมาแก้ไขในภายหลังจะเป็นเรื่องที่ยาก แต่ปัญหานี้เป็นเรื่องนอกเรื่องของบทความนี้ครับ สิ่งที่ผมอยากจะบอกก็คือ การทดสอบครั้งสุดท้ายของลูกค้านี่แหละ เรียกว่า Acceptance Testing
สรุปแบบสั้นๆ ในแง่มุมของ Software บ้าง
- Unit Testing คือการทดสอบโมดูล หรือฟังก์ชั่นแต่ละส่วนงาน ว่าทำงานได้ถูกต้อง โดยไม่จำเป็นต้องไปเชื่อมต่อกับโมดูลอื่นๆ แต่ Unit ที่ว่าอาจจะมีขนาดเล็กๆ เพียงแค่ฟังก์ชั่นเดียว หรือขนาดใหญ่เป็นอ็อบเจ็กต์ขนาดยักษ์เลยก็เป็นไปได้
- Integration Testing คือหลังจากที่โมดูลแต่ละส่วนประกอบเข้าด้วยกันแล้ว ก็ทำการทดสอบระบบในภาพรวม
- System Testing หลังจากระบบที่ทดสอบใช้งานได้แล้ว เราก็จะต้องนำระบบดังกล่าวขึ้น environment จริงๆ (เช่น Server จริง) และทำการทดสอบอีกครั้ง
- Acceptance Testing หลังจากนั้นท้ายสุดเราก็ส่งมอบให้กับลูกค้าเพื่อทำการทดสอบครั้งสุดท้าย
(การทดสอบโปรแกรมตามหลักการนี่มีหลายขั้นตอนดูดีและเป็นมืออาชีพ แต่เอาเข้าจริงชีวิตโปรแกรมเมอร์แทบไม่เจอรูปแบบการทดสอบขนาดนี้หรอกครับ ส่วนใหญ่แค่เขียนโปรแกรมให้ทันกำหนดก็ลำบากแล้ว เวลาทดสอบจริงเหลือแค่ไม่กี่วัน และก็ไม่ได้ทดสอบครบทุกขั้นตอนแบบนี้หรอก ผมพนันได้เลย)
ร่ายกันมาตั้งยาวครับ บทความซีรี่ย์นี้ผมจะเน้นไปที่เรื่องของการทำ Unit Testing โดยการใช้ Framework ที่มีชื่อว่า NUnit บน Microsoft .NET
โพสต่อไปผมจะพูดถึงแนวคิดพื้นฐานของ Unit Testing ที่ดี และเริ่มต้นการใช้งาน NUnit ด้วยตัวอย่างแบบง่ายๆ
แต่ก่อนจะถึงตรงนั้น ผมจะฝากโค้ดโปรแกรม Unit Testing เล็กๆ ซักอันให้ผู้อ่านได้ลองบริหารสมอง มาลองเดากันดูสนุกๆ ก่อนครับ ว่า NUnit นั้นมีแนวคิดและวิธีการทำงานอย่างไร จากโค้ดโปรแกรมด้านล่างนี้..?
using System;
using NUnit.Framework;

namespace bank
{
    public class Account
    {
        private float balance;
        public void Deposit(float amount)
        {
            balance += amount;
        }

        public void Withdraw(float amount)
        {
            balance -= amount;
        }

        public void TransferFunds(Account destination, float amount)
        {
        }

        public float Balance
        {
            get { return balance; }
        }
    }
}

namespace bank
{
    [TestFixture]
    public class AccountTest
    {
        [Test]
        public void TransferFunds()
        {
            Account source = new Account();
            source.Deposit(200.00F);
            Account destination = new Account();
            destination.Deposit(150.00F);

            source.TransferFunds(destination, 100.00F);
            Assert.AreEqual(250.00F, destination.Balance);
            Assert.AreEqual(100.00F, source.Balance);

        }

        [Test]
        public void DepositFunds()
        {
            Account source = new Account();
            source.Deposit(200.00F);
            Assert.AreEqual(200.00F, source.Balance);
        }

    }
}

namespace UnitTestDemo
{
    public class MyAccountingSoftware
    {

        public static void Main()
        {
            bank.Account DemoAccount = new bank.Account();
            DemoAccount.Deposit(1000.00F);
            DemoAccount.Withdraw(500.50F);
            Console.WriteLine("Our account balance is {0}", DemoAccount.Balance);
        }

    }
}
แล้วโพสหน้าผมจะมาเฉลย ระหว่างนี้ไปโหลด NUnit มาติดตั้งที่เครื่องก่อนนะครับ โดยคลิกไปที่นี่
แล้วเจอกันใหม่ตอนหน้าครับ
วันศุกร์ที่ 16 ตุลาคม พ.ศ. 2558
กู้ windows licence จาก OEM
Download Windows 8.1 with Update 1 Retail and OEM .iso
Contents
- Introduction
- Determining your Edition and whether your License is OEM or Retail
- Determining your Edition when Windows cannot Boot
- Downloading a Windows 8.1 .iso
- English File Sizes
- Creating a Bootable USB
- The Media Center Edition and “Get Features with a New Edition of Windows”
- The with Bing Editions
- Evaluation & Generic Product Keys
- Determining the OEM UEFI BIOS Embedded SLP Key
- Feedback for Microsoft
Part 1: Introduction, Editions and Product Keys
This guide will take you through the use of the Windows 8.1 Media Creation Tool to download and prepare a Bootable USB for a UEFI BIOS with SecureBoot or a MBR BIOS. It will instruct you around a lot of traps other guides fail to address and also highlight the current limitations:The Windows 8.1 with Update 1 Media Creation Tool will work with both Windows 8.1 “Edition” and Windows 8 “Edition” product keys.
This tool treats Windows 8 “Edition” and Windows 8.1 “Edition” as equivalent. There are 5 “Editions” available for Download. Each “Edition” is non-interchangeable.
- Windows 8 = Windows 8.1
- Windows 8 Single Language = Windows 8.1 Single Language
- Windows 8 Pro = Windows 8.1 Pro
- Windows 8N = Windows 8.1N
- Windows 8 Pro= Windows 8.1 ProN
- Windows 8.1 with Bing
- Windows 8.1 Single Language with Bing
- Windows 8.1 Professional with Media Center
For the retail license Berlarc Advisor can be used to determine your product key. In the case of the Media Center Edition record the Internet Explorer Key (it’ll be the original Edition) and the Media Center Key. Its more advisable to obtain the keys from the order confirmation emails or retail packaging.
Part 2: Determining your Edition and whether your License is OEM/Retail from System
The easiest way of determining what edition your product key when the previous installation can boot is by System. If you cannot boot into your OEM installation see Determining your Windows Edition when your System Cannot Boot.To get to system right clicking the start button (or pressing [Windows] and [x]) and then select system:

If you have Windows 8.0 there is no Start Button so you may press the [Windows] and [Pause|Break] key to launch system or access it from Computer in Windows Explorer.

Look at the product ID at the bottom and see if the product ID mentions the words OEM. If the license is OEM then your product key will reside within the system UEFI/BIOS known as a System Locked Preinstallation (SLP) key. If you have a supported OEM Edition proceed to Downloading a Windows 8.1 with Update 1 .iso.
If on the other hand your license does not mention OEM, you should have a Retail product key in a confirmation email or in retail packaging. If you have your key proceed to Downloading a Windows 8.1 with Update 1 .iso.
Part 3: Determining your Windows Edition when you Cannot Boot into your OEM Installation
As retail product keys are sold directly by Microsoft the Edition and key are usually clearly printed in the confirmation email or retail packaging.This part mainly concerns OEM product keys as there are more Editions and the product key (SLP key) resides in the UEFI BIOS. Many that will advise you on Windows installation on Microsoft Answers will say the choice is very easy and that there are only two “Editions” to choose from in accordance to your sticker and are wrong…
Home Editions
If you have this sticker which says “Windows 8” you likely have one of the following three editions:

- Windows 8.1 Most Common
- Windows 8.1 Single Language Common
- Windows 8.1 N Rare
The “N” Editions are rare so try these only if the regular .isos don’t work.
Home with Bing Editions
I had a look at a few shops BestBuy, PC World, Staples in the US, CA and in the UK. I checked the sticker at the base of the system and compared this with the Edition in system properties. I was looking in particular for a difference in the with Bing systems. Although all the systems have a sticker which just says “Windows 8” similar to the other 3 Editions which the Media Creation Tool Supports it was a different sticker.
If you have this sticker which looks like the following you likely have one of the with Bing Editions which are unfortunately not supported by the Microsoft Windows 8.1 Media Creation Tool:


- Windows 8.1 with Bing Most Common
- Windows 8.1 Single Language with Bing Common
If you have this sticker you likely have one of the following 2 editions:

- Windows 8.1 Pro Most Common
- Windows 8.1 ProN Rare
The “N” Editions are rare so try these only if the regular .isos don’t work.
RT Edition
If you have this sticker you have Windows RT:

A Windows RT device has hardware in particular a processor that is non-Intel/AMD using instead Arm processors. These devices were made to compete with Chrome Books as budget devices and prolonged battery life.
However in reality Arm processors do not scratch the potential of Intel/AMD processors because of the magnitude of third party applications written using either the Intel x86 or AMD x64 architectures (Intel and AMD have an agreement – Intel use AMD x64 and AMD use Intel x86).
These means the overwhelming majority of third party applications will run fine on Windows 8 but not on Windows RT. This gives Windows RT essentially the capabilities of Windows Phone…
This Edition was terribly marketed and sold often by shops as Windows 8. As a consequence of being sold and marketed as a broken variant of Windows 8 with the end user seeing it as a device with Windows 8 but with nothing working, Windows RT was highly unpopular. In turn as it was unpopular, developers never felt the urge to write programs which would run on Windows RT therefore making it redundant.
Windows RT is unfortunately unsupported by the Windows 8.1 Media Creation Tool and you have to procure installation media from Dell. Needless to say I don’t recommend Windows RT and don’t classify it as an Edition of Windows 8.
Don’t have a Windows 8 Sticker?
If you don’t have one of these stickers affixed to your system you likely got a system shipped with Linux or an earlier Edition of Windows and hence won’t have a UEFI BIOS Embedded SLP key. Its possible the Windows 8 sticker peeled off however you can check to see if you have a UEFI BIOS Embedded SLP Key using RWEverything see Determining your UEFI BIOS Embedded SLP Key.
Checking Edition from Dell Original System Configuration
You might also be able to get a hint of the preinstalled Windows Edition from Dells original system configuration, its worth quickly checking this out before committing to download a 4 GB .iso.
For Dell systems you may want to go to www.dell.com
Select support and then support by product:

Enter your service tag found at the base of your system or within the Dell UEFI BIOS Setup:
 Select System Configuration:
See if System Configuration mentions anything about the original installed Windows Edition. In some cases Dell fill in the Original System configuration very well in other cases they do not.
Editions are not Equivalent
The important take home note regarding the Windows 8.1 “Editions” are they are not equivalent as far as installation is concerned:
Windows 8.1 (Core/Home) ≠ Windows 8.1 N (Core/Home) ≠ Windows 8.1 SL (Core/Home) ≠ Windows 8.1 with Bing ≠ Windows 8.1 SL with Bing ≠ Windows 8.1 Pro ≠ Windows 8.1 ProN
If the wrong .iso is used with your OEM product key then you will get stuck on the Enter Your Product Key Screen:

If the correct .iso is used, your OEM key will automatically be input and you will be taken straight to the License Agreement Screen:

As the correct Edition will not ask for a OEM product key but the incorrect Edition will you may need to use a bit of trial and error to get the correct Edition for instance try Windows 8.1 and then Windows 8.1 Single Language.
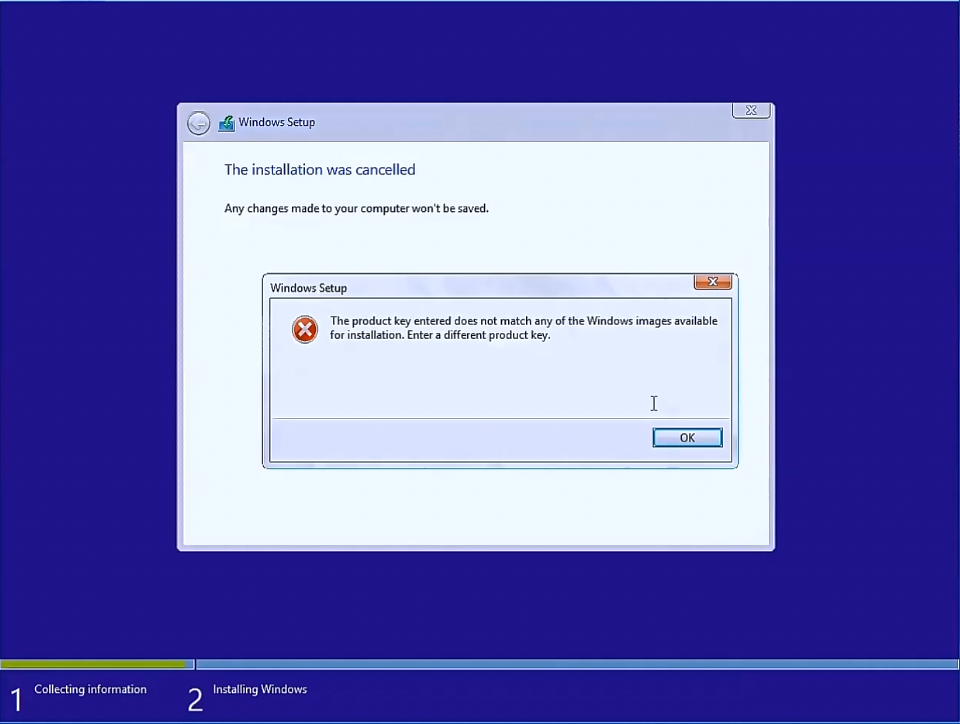
For the retail license, its easy to determine your edition from your physical media or confirmation email. If however during installation you enter a Retail key for the wrong Edition you will get the error message:
“The product key entered does not match any of the Windows Images Available for Installation. Enter a Different Product Key.”
Then installation will then abort.
Part 4. Downloading a Windows 8.1 “Edition” .iso with “The Windows Media Creation Tool”
While this tool seems simplistic to use there are some common issues:- Do not use a DVD it will be rejected by a UEFI BIOS with SecureBoot and you won’t be able to boot. For a legacy MBR BIOS there may also be burning issues. I don’t recommend DVD media at all.
- If you use the Media Creation tool on a 8 GB or superior USB flash drive directly and it has been formatted as NTFS and not FAT32 the USB will be created with a NTFS format and it will be rejected by a UEFI BIOS with SecureBoot and you won’t be able to boot.
This tool is a .exe and can only be ran on Windows 7, Windows 8, Windows 8.1 or Windows 10. Microsoft have locked out its use even on Windows Vista (another sign that its dead) and Windows XP. It cannot be ran on Linux or Apple OS unless a Windows VM is used (with Windows installed).
A bit of a catch 22 for those stuck on Windows XP (with compatible hardware), Windows Vista, Linux or Apple OS, you have to install a modern Windows OS in order to download a modern Windows OS… Use the Windows 10 TP which is available as a direct .iso download. Evaluate Windows 10 TP until it reaches RTM and then see if you get any discounts; alternatively if you have a Windows 8/8.1 license and want to reinstall it use the Windows 10 TP to launch the Media Creation tool.
The Windows 8.1 Media Creation Tool can be downloaded from here and allows for selection of language, 5 Editions and also architecture:
If the links down see here.
This tool gives a Windows 8.1 “Edition” with Update 1 .iso.
Retail Notes:
These new Windows 8.1 with Update 1 “Edition” .isos will accept both Retail Windows 8 “Edition” and Windows 8.1 “Edition” product keys during installation. Product activation will occur automatically upon first connection to the internet.
This new set of installation media does not discriminate between Windows 8 product keys which were sold as Upgrade Only and Windows 8.1 Product Keys which were sold as Full. My clean installation with a Windows 8.1 Professional with Update 1 on a system with an upgraded processor and the hard drive replaced with a securely wiped SSD using a Windows 8.0 Professional key from the initial 30 day promotion, automatically activated online without any issues.
OEM Notes:
The tool itself does not require entry of a product key to download the installation media. The Windows 8.1 with Update 1 “Edition” .iso will automatically input OEM UEFI/BIOS Embedded System Locked Preinstallation Windows 8.0 “Edition” and Windows 8.1 “Edition” keys. Product activation will occur automatically upon first connection to the internet. There is thus no longer any need to use a third party utility to obtain your product key.
Double click the mediacreationtool
Select Run

The downloader will load displaying the Windows logo:

You will asked for Language, Edition and Architecture:

Microsoft offer a large assortment on languages as shown, pick your desired language.
I’m going to select “proper English” i.e. “English – en-gb”:

You will then be prompted for your Windows Edition – in this case I am going to select Windows 8.1:

Then you will be prompted for your architecture. I’m going to select the 64 Bit version, in most cases the 64 Bit version should be selected.
The 32 Bit version should only be used for legacy applications or weaker hardware such as tablets.

When you have selected your 3 desired options select next:

Saving the .iso gives you an easy means of creating a Bootable USB later on. Should something go wrong with the USB creation or you format the USB by mistake accidentally you will need to download the media again. Taking the additional step to save the .iso is therefore recommended in this guide.
Then select to save the .iso file and select next:

Select the location to save and name of your .iso and select next:

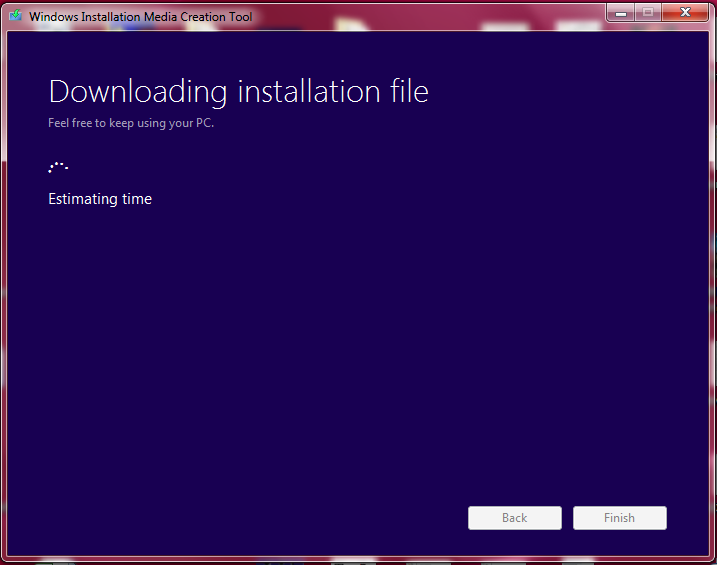
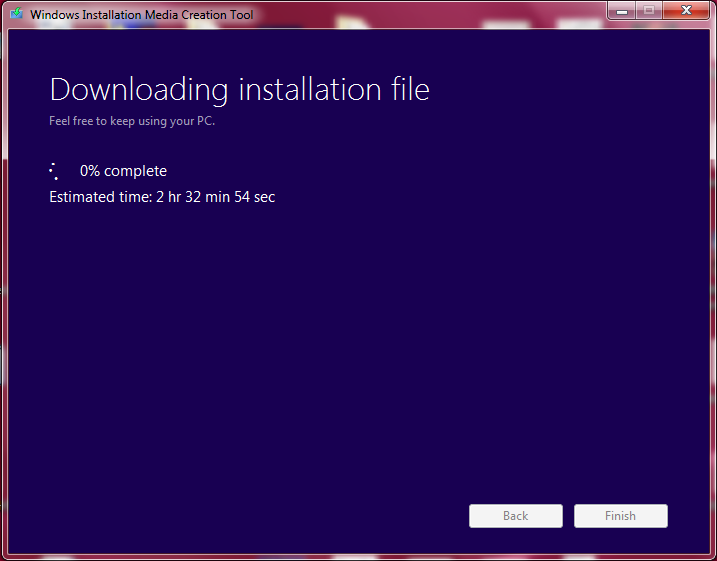
The .iso will download:


Once you .iso is saved select Finish.
If you want to download another Edition or Architecture simply launch the media creation tool again.
Part 5: English File Sizes
The English 64 Bit UK .isos I downloaded were the following size:
The English 32 Bit UK .isos I downloaded were the following size:

The English 64 Bit US .isos I downloaded were the following size:

The English 32 Bit US .isos I downloaded were the following size:

As you can see the size appears to be different for Languages and Editions.
Part 6: Creating a Bootable USB
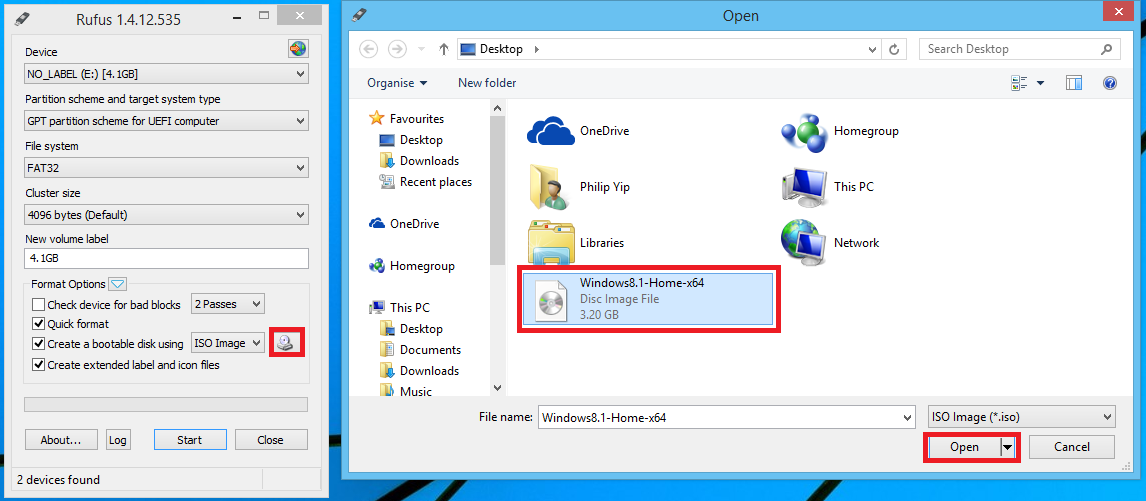
You may use Rufus to create a bootable USB:Rufus does not need to be installed and can be run directly by double clicking on the application.

Select your 8 GB or superior USB flash drive:

Select the .iso:
There are two types of bootable USB you can make with Rufus The “GPT partition scheme for UEFI computer” or the “MBR Partition Scheme for BIOS or UEFI Computers”.
For all Windows 8 and Windows 8.1 OEM licenses you should select the “GPT partition scheme for the UEFI Computer”.
For Windows 8 and Windows 8.1 RETAIL Licenses you will need to determine if your system has a UEFI BIOS with SecureBoot. If it does then use “GPT partition scheme for the UEFI Computer” and enable these technologies before installation. If it doesn’t you’ll have a BIOS with legacy settings and “MBR Partition Scheme for BIOS Computers”.
Globally Unique Identifier Partition Table (GPT) Partition Scheme for UEFI Computer
Use with Dell hardware and Windows 8.1 64 Bit with a UEFI BIOS later than 2012. Enable UEFI and SecureBoot.
Requires systems that have a Unified Extensive Firmware Interface (UEFI) Basic Input Output (BIOS) and also 64 Bit Windows. These requirements are in general standard across hardware post 2012 i.e. hardware Dell shipped with Windows 8 or later.
This is a new partition scheme which is more reliable than the MBR partition scheme. In GPT multiple copies of partitioning and boot data are stored on the hard drive and checks they are consistent.
This partition scheme has the advantage in the fact that it can support >2 TB drives and can create up to 128 Partitions.
This will support newer security technologies such in the UEFI BIOS such as SecureBoot and these should be enabled.
2010-2011 hardware may or may not have a UEFI BIOS and you will need to check and enable the settings in the UEFI BIOS setup if applicable. These settings will also need to applied correctly for systems that have previously been running Windows 7 (e.g. downgrade rights).
Master Boot Record Partition Scheme for BIOS or UEFI Computer
Use with Dell hardware and Windows 8.1 with a Legacy BIOS earlier than 2010.
This can be used for an older system pre-2012 with a legacy Basic Input Output System (BIOS) so is required for pre-2012 hardware and for Windows 8.1 32 Bit.
Limited to 2 TB of space and to 4 partitions.
This partition scheme is less reliable as the partitioning and boot data is stored in one location meaning if its corrupt then the data is lost.
If you do not select the USB Device, then load the .iso and then select the Partition Scheme and File System in order, Rufus may revert some of the settings to defaults which may be incorrect.Select the “GPT partition scheme for UEFI computer” or the “MBR Partition Scheme for BIOS or UEFI Computers” respectively depending if your hardware is post 2012 or pre 2012.

Select the FAT32 file system. SecureBoot requires the bootable USB to be formatted as FAT32 otherwise it won’t boot.

Click start:

Select OK to format the USB flash drive:

Rufus will now create the Bootable USB:

When its ready it’ll say “Done” to the bottom left. You may now close Rufus and have a bootable USB for installation.

If you had no problems determining your Edition, making the .iso and are ready to clean install see Windows 8.1 Installation.
Part 7: Special Notes Windows 8.1 Pro with Media Center Edition and “Get Features with a New Edition of Windows”
Windows 8.1 Pro with Media Center is a 2 stage installation. It requires installation of the base Windows 8.1 “Edition” (non-N, the N Editions are Windows with Native Windows Media Player Capabilities Removed) which needs activated and then “Get Features with a New Edition of Windows”.When Media Center is installed the base Windows installation cannot be determined using System you will be in a similar case to users who cannot boot see Determining your Edition when Windows cannot Boot.
After installing your original Edition. The easiest way of adding the product key is via system by right clicking the start button (or pressing [Windows] and [x]) and then selecting system:
In system you should first check at the bottom that your old version of Windows is activated otherwise you may run into an issue upgrading to media center.
In system select “Get more features with a new edition of Windows”.

Select “I already have a product key” or select “I wish to buy a key online” if you want to purchase a new upgrade key. At this stage I do not recommend paying for media centre as you will lose it when you take the free upgrade to Windows 10 therefore the cost is not worthwhile:
 Enter in your Media Center key:
 Select next
Select Add Features
 Then select close. You may want to recheck that Windows is activated under system.
Theoretically the following pathways to Media Center are possible with the ones crossed out being a complete waste of money and time:
Windows 8.1 SL Core → Windows 8.1 Core →Windows 8.1 Professional → Windows 8.1 Professional with Media Center.Windows 8.1 SL Core → Windows 8.1 Professional → Windows 8.1 Professional with Media Center.- Windows 8.1 SL Core → Windows 8.1 Professional with Media Center (Pro Pack).
Windows 8.1 Core → Windows 8.1 Professional → Windows 8.1 Professional with Media Center.- Windows 8.1 Core → Windows 8.1 Professional with Media Center (Pro Pack).
- Windows 8.1 Professional → Windows 8.1 Professional with Media Center.
- Core N → Professional N → No further Upgrade
- Professional N → No Further Upgrade
* The test of Windows 8.1 SL Core → Windows 8.1 Core →Windows 8.1 Professional → Windows 8.1 Professional with Media Center using generic keys gave only the Windows 8.1 SL Core (Internet Explorer Key) and Windows 8.1 with Media Center (as Key: None Activated).

Part 8: The with Bing Editions
Windows 8.1 with Bing can only be preinstalled with low end budget devices. It was a freebie with the supposed only limitation that OEMs cannot change the default search results from Bing to another vendor. The second limitation is never marketed and that is there is no official .iso and its not supported by the Windows 8.1 Media Creation Tool.This problem will be solved with Windows 10 TH2:
https://blogs.windows.com/windowsexperience/2015/10/12/announcing-windows-10-insider-preview-build-10565/
The Windows 10 Home TH2 .iso will likely automatically input the Windows 8.1 with Bing UEFI BIOS embedded SLP keys automatically and activate online making the system a Windows 10 Home Device.
The Windows 10 Home Single Language TH2 .iso will likely automatically input the Windows 8.1 with Bing UEFI BIOS embedded SLP keys automatically and activate online making the system a Windows 10 Home Single Language Device.
This section is a place holder just in case. It seems Microsoft are not providing a .iso for these “free Editions”. Their current stance is if you want to reinstall these you need to contact the OEM for installation media. However procurement of this media can cost up to half the price of the budget device in some cases. I think they should make this .iso available and left feedback here:
https://windows.uservoice.com/forums/265757-windows-feature-suggestions/suggestions/6968237-windows-media-creation-tool-fixes
If you find information about .isos for these editions please leave comments.
Part 9: Evaluation & Generic Product Keys
To be honest there is zero point in evaluating Windows 8.1 and paying for a Windows 8.1 license at present given it is made obsolete by Windows 10. Moreover Microsoft have made it known that Windows 10 will be a free upgrade for all Windows 7 users and Windows 8.1 if they take advantage of the offer within the promotional time window of 29/07/2015-29/07/2016.The Windows 8.1 Media Creation Tool will not run on Windows XP or Windows Vista so the user will need to run the tool on a Windows 7, Windows 8.0, Windows 8.1 or Windows 10 installation in order to download the retail .iso.
Assuming you can download the .iso on a Windows 7, 8.0, 8.1 or 10 computer to evaluate Windows 8.1 Retail editions you may bypass the enter your product key screen, using a generic key to install Windows 8.1 of your desired Edition and architecture. These keys allow for installation but not product activation:
- Windows 8.1=334NH-RXG76-64THK-C7CKG-D3VPT
- Windows 8.1N=6NPQ8-PK64X-W4WMM-MF84V-RGB89
- Windows 8.1 Single Language=Y9NXP-XT8MV-PT9TG-97CT3-9D6TC
- Windows 8.1 Professional=XHQ8N-C3MCJ-RQXB6-WCHYG-C9WKB
- Windows 8.1 Professional N=JRBBN-4Q997-H4RM2-H3B7W-Q68KC
- Windows 8.1 Professional with Media Center=GBFNG-2X3TC-8R27F-RMKYB-JK7QT
The generic key may also be used to evaluate Windows 8.1; if you like it and your system performs well; you can simply go out and buy a retail product key and select change product key.
The easiest way of adding the product key is via system by right clicking the start button (or pressing [Windows] and [x]) and then selecting system:
In system select Activate Windows:

Either enter the key which you bought from a retail purchase or select buy key.

Microsoft also allow the Windows 10 Enterprise Edition as a trial:
However the Enterprise edition cannot be converted into a retail install and hence if the customer gets their system up and running nicely they will need to clean install Windows 8.1 again after purchasing a product key. Therefore I recommend evaluation of the Retail License via the use of generic product keys.
Part 10: Determining the UEFI BIOS OEM Embedded System Locked Preinstallation Key
The OEM product key (SLP key) is hidden within the UEFI BIOS. In order to determine your product key, the RWEverything utility is recommended as it looks at the systems hardware to determine the Windows product key and not at the registry, meaning it does not give bogus results like other utilities:- Download Link: http://rweverything.phpnet.us/
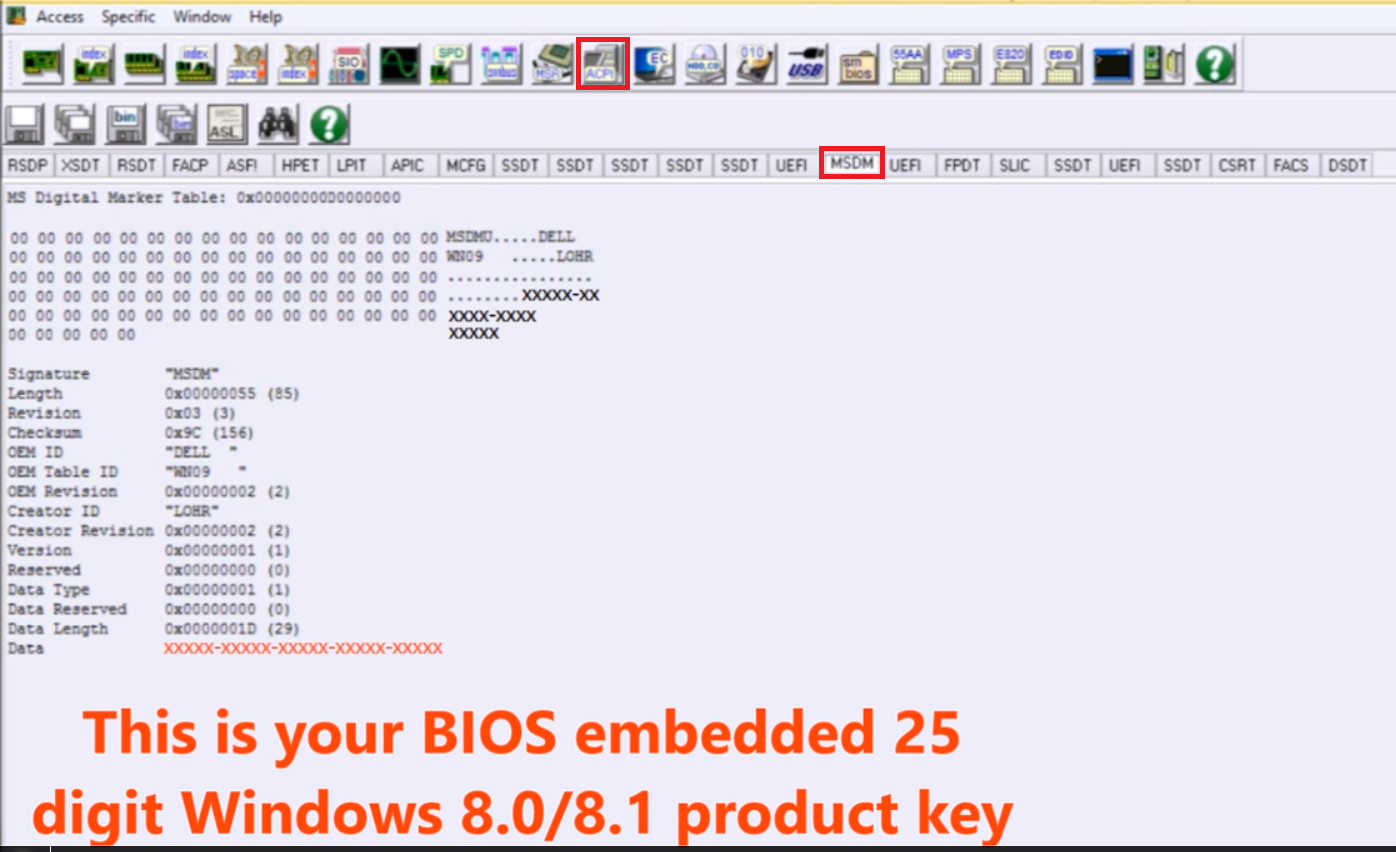
Note no MSDM tab = No Windows 8.0/8.1 BIOS Embedded SLP key.
- This key is classified as hardware (part of the motherboard) and so Microsoft will not be able to help you if this tab is missing.
- Systems which shipped with Windows XP, Vista or 7 have no MSDM tab as these versions of Windows used a generic key for OEM SLP; you need to purchase a retail product key for these systems. Note if you have purchased a retail license for such systems there will be no MSDM tab.
- If you have a systems which came with Windows 8.0/8.1 and no MSDM tab then you need to contact your OEM for a motherboard replacement or purchase a retail license. Its extremely rare for an OEM motherboard to lose its Windows 8.0/8.1 key but I have seen a few examples.
สมัครสมาชิก:
ความคิดเห็น (Atom)